Friday, December 22, 2023

DIY Haikyuu! Uniforms

Idea

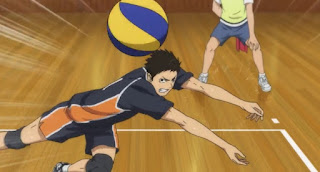
I had the idea to make Haikyuu uniforms for me, my niece, and my son. It didn't seem too hard... but I thought about it for a few years, literally, before finally starting. I just wanted comfy, maybe pajama-like outfits that looked convincingly like Karasuno High's uniforms. I chose Suga's number; my son chose Hinata's; and my niece chose Noya's (and so needed one with orange as the main color instead of black).

Supplies

T-shirts

I started with Hanes Beefy-T t-shirts from the Hanes website. They a nice, heavy quality jersey, are often on sale... and used to come in orange as well as black. They seem not to have orange any more in the regular Beefy-T t-shirts, but they do have the "original Hanes men's t-shirt" or "garment-dyed t-shirt" in orange, it seems.

Anyway, I ordered several 2x and 3x Beefy-T shirts in black and orange, and some cotton jersey shorts as well.

Note: I originally bought the dark shirts in navy, because I thought they were navy and are often portrayed that way... then confirmed that the uniforms are actually black and orange.

Numbers and Kanji

I bought iron-on white numbers from Michaels. I plan to cut the Kanji and the barefoot/ics images from unused numbers. I printed them out reversed so that cutting them out results in unreversed images.

Trim

For the white trim, I originally thought I'd use regular bias tape, but at the fabric store, I found there is such a thing as jersey bias tape. It's knit instead of woven and so is very stretchy, like jersey fabric. They didn't have enough of white, so I ended up getting "natural," but against the stark colors, I think it looks great!

Tools

I also bought ballpoint sewing-machine needles, as those are best for knit fabrics. In addition, I used a cutting mat and rotary cutter to cut the shirts.

Stitch Used

Because it is a knit fabric, a regular straight stitch is not a good choice, as it will not stretch with the fabric and will likely snap. The fabric store advised using zigzag, but making it narrow and short rather than wide and long.

行きましょう!(Let's go!)

Collars

I did the collars first, cutting each collar by hand out of a t-shirt (one black, one orange) and swapping them. I left about 1/4" to sew together. I used black thread but I think with the heaviness of the fabric, the thread color wouldn't really matter. I went back over some spots where I missed the edge of fabric underneath. 

The second option allows you to have the golf-shirt style collars that are on the actual uniforms. I found ribbon on Etsy that could have let me do this, but I chose the path of simplicity.


Sides

I had originally sketched the sides as curved on the edges, but then realized that the uniform photo I had printed out showed that, but was wrong. The sides are straight lines:
(Image copy right Haruichi Furudate, of course)

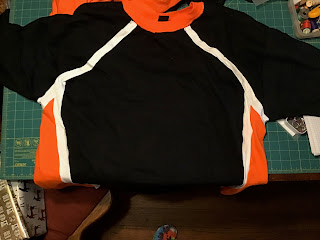
I lay the shirts on my cutting mat and cut 2.5" in from the edge (so 5" wide). I envisioned the diagonal stripe that goes from the collar to the armpit and stopped cutting about where the intersection with the vertical stripe would be, and then cut around the armscye to finish. I repeated this on the other side, and swapped the pairs of fabric strips.

To join them together, I had originally thought to lap the fabrics and zigzag on top, then sew the bias tape over that seam, to cover the zigzag. A gal at the fabric store pointed out that I could use the way the bias tape is prefolded, and sew each edge of colored fabric to the folded-over edge of the bias tape (I'll draw a sketch of this later to be clearer). I think it turned out great. Here is the first finished side seam:

Neck/armscye trim

I finished all of the side seams in the same way, and then began the trim that goes from the collar (where I didn't need to join fabrics) down to the top of the vertical trim, around the armscye below the sleeve, and then back up to the collar on the back.

First bit of trim pinned on, meeting the vertical stripe:

Since this part of the trim starts off as basically appliqué, I tucked the raw end of the trip under a bit and then zigzagged each edge down to the open seam at the armscye. So this is (for the Hinata jersey) black above and orange below. I used the same method as for the sides here, sewing one folded edge to the orange fabric and the opposite edge to the bottom of the armscye. I had to do some trickiness to join the appliquéd trim to this section, so I pinned and stitched just to make the edges meet up and not have open holes. After this part, I continued the trim up to the back of the collar. I repeated this on the other side.

One side modeled by my son:


Sewing: Done!

The Hinata jersey is all sewn and just needs its numbers and kanji:

And here's the libero jersey (#4, Nishinoya):

Numbers and Kanji/decorations

I ironed on the numbers, front and back, according to the directions on the Michael's package. Then I took a number I knew I wouldn't need (the 8) and cut the kanji and footprint/"ics" out of it. But first, I flipped the design horizontally. I watched a YouTube about using stencils with iron-ons and was so glad she pointed out that you need to flip your image, so that the ironed-on image is facing the right way.

I grabbed screenshots of the kanji and the footprint, pulled them into Preview on my mac, and flipped them horizontally.


After printing them out at the size I wanted, I taped them to the unused '8' and cut the designs out with a sharp Xacto knife on my small cutting pad from Daiso.


The little bits below "Karasuno" and the dot for the "i" wouldn't stay on the iron-on plastic, so I ended up bonding the numbers and the main decorations first, and then carefully placed the bits and the "i" dot and re-ironed them on (front and back). I'm really pleased!

Done!

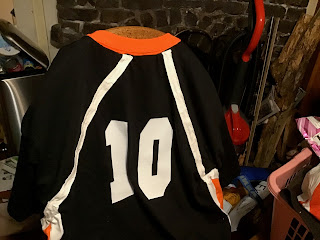
Hinata jersey, front:

Back:

Nishinoya jersey, front only:

Final Notes

I wish I'd had time (and enough of the trim! I used well over 4 yards per jersey) to do the third jersey, #2 Sugawara, for me, as well as the matching shorts for each of us. Maybe sometime soon!


Friday, May 30, 2014

How to check out and listen to an audio book on Overdrive

I mainly use Overdrive, and have for years, to check out audio books. I had considered paying for Audible (you can get free access for 30 days to try it out), but then I joined the San Francisco library and got access to 3-4 times as many audio books as the Alameda Free Library has.

As I've covered before, you can log into the Overdrive site and check on availability. Similar to the Kindle type of books, the available audio books have a black set of headphones if they're available, and grey if not.
Note that the Janet Evanovich is the only one currently available.
To check one out, go to its page and click Borrow, as you did for the Kindle book. Also as with the Kindle book, when you click Borrow, you get a choice of formats.
MP3 is universal. WMA is a Windows-only format.
Here's a difference: you need to download the MP3 Audiobook on a computer on which you've got the Overdrive app or program. See the "Get the App" button on the right?

On your computer or iDevice, you'll want the Overdrive Media Console.

On a laptop or desktop computer: once you click Download (after choosing a format), you'll get a .odm file on your computer. Start Overdrive Media Console and do File->Open to load up the .odm file (or double-click it). Note that the audio book has not yet been downloaded. Once you've opened the .odm file in the console, you'll get a dialog to start downloading the .mp3 or .wma files onto your computer. This may take a while.


Here's the tricky part: once it's downloaded, you can use the "transfer" button to transfer the audio book onto your iPod.


I recommend against this, and here's why:

If you instead load the audio book in iTunes with cmd-O (my audio books end up in Documents->My Media in a folder with the book's title), it won't expire. You'll have it until you delete it. Copying it into iTunes in this way makes a copy and although Overdrive may delete that copy under My Media, the files in iTunes won't disappear until you overtly delete them. Cool, eh?


One last note on uploading audio books: you will have to select the files once they're uploaded to iTunes, do cmd-I (Get Info) and change their type in Options to Audiobook*.

*I tend to select "part of gapless album," "skip when shuffling," and "remember playback position." This last is the most important, I think.

I also find it useful to right-click the selected files and have it create a playlist. In my car, it makes it easy to find my audiobooks if I do this.


If you use Overdrive Media Console directly on your iPod, you will lose the book after the loan period expires. It can be useful if you don't have a computer to download to, or don't want to take that extra step. You'll have to play the audiobook from OMC rather than from iTunes.

To put the book on your iPod, hook your iPod up, select it, select "Books" and then Audiobooks. Make sure "Sync Books--Selected Books" is chosen, then scroll all the way down, and select the playlist under "Include audiobooks from playlists." Sync your iPod, and you're done!


A few more thoughts on Overdrive books

My book loan expires in a day. I'm not done, so I went to the Overdrive site to see if I could renew it. Unlike returning a book, renewing is done on the Overdrive site itself. See the circular arrow and the word "Renew" next to Unseen Academicals?
Left book has been renewed; right one is available to renew.


 If you click on Renew, it'll attempt to renew the book for you for 3 more weeks. In the case of Divergent, it had holds on it and wasn't available to renew. (Overdrive kindly offers to add me to the hold list. Only 212 ahead of me, argh.)


How to get more Kindle and audio books

San Francisco Public Library has a limit to how many e-books you can have out at a time. I came up against that limit recently. I wanted to get a book out for my son to read, but had too many checked out.

You can't return a book on the SFPL Overdrive site, nor on the Kindle itself.

But you can return books on the Amazon website, under Your Account->Manage Your Content & Devices.

If you click the "..." button next to a checked-out book, you'll get a pop-up menu.

I added that circle to "Return this book."

Select "Return this book," and after a while, it'll disappear from your checked-out shelf on the Overdrive site, freeing up a slot for another audio or Kindle book!

Next, I'll show you how to check out and use an audio book on Overdrive.

How to get FREE audio and Kindle books

Both the Alameda Free Library and the San Francisco Public Library offer a significant number of eBooks--electronic books. I've been listening to downloaded audio books, and reading Kindle books, for free, for a few years now.

I'll deal with Kindle books first. I have an iPad with a (free) Kindle app on it. To get a Kindle book, I first go to the Overdrive site for my library. In this case, I'll show you the San Francisco Public Library's site.

Overdrive site for San Francisco Public Library
(Side note: you can get a San Francisco Public Library card just by filling out an application and appearing in person, with ID, to pick up the card. Free except for the price of transportation. I highly recommend filling out the application online to save time.)

You log in with your library card number and PIN, and it takes you to your home page.

Main Overdrive page
From there, you find a book to take out. Note that books that are available have a dark "open book" symbol, whereas those that are not currently available have a greyed-out symbol. Even if a book isn't available, it's possible that it'll be available soon. You can check on this by going to that book's page and looking on the lower right for the number of copies and the number of patrons on the hold list. Everyone has a maximum of 3 weeks' checkout (renewable only if there is no one on the hold list), so a title can be available rather quickly.
Available book. Note Copies info at lower right.

Or, in the case of something new and popular, it can take weeks. I like to put several books on hold and see what might come up.
Unavailable book. (big surprise) Note patrons-on-hold info at lower right.

You put a book on hold by going to its page and clicking "Place a Hold" (if it's unavailable) or "Borrow" (if it is). If it's available, you're shown your Holds page, with the borrowed book shown.
Latest book borrowed will be at upper left.
When you click the Download button, you usually have the option of selecting a desired format. Choose Kindle Book, then Confirm & Download.


You'll be sent to the Amazon.com site. If you're already logged in, you should see a screen like this:

Amazon checkout screen. Your Kindle devices will be in the "Deliver to:" drop-down menu.

Select the Kindle or thing-with-Kindle-app from the dropdown menu, then "Get library book."

That's it! The next time you sync your Kindle or Kindle app, you'll have the new book. (Don't forget to tap the book title to download while you have WiFi if you intend to read it away from WiFi.)

Once a previously unavailable book becomes available, the email tells you which book is now available and includes a link to get back to the site quickly. Log in again, and it'll go right to your holds page. Note that if you don't snag the book quickly, it'll go back into circulation. This is similar to putting paper books on hold; if you don't get them in a few days, they'll be removed from the hold shelf and returned to circulation.

You can check on unavailable books on the holds page. Your user number will decrease as books are returned.

I'll be waiting a long time to read Divergent.

Next, I'll show you how to return a Kindle book. It's very easy.

Friday, August 9, 2013

Laundry tips

I have some friends who rave about OxyClean. Our Costco had a big bin of it, and because of their generous return policy (any time, full price back), I bought a tub and brought it home.

It's supposed to help your own detergent work better, so I tossed a scoop in several loads of laundry. No improvement. It's also supposed to be amazing on spots, so I wet some and scrubbed it in. Nada.

Returned it.

Oil and Other Spots
Then my friend Liz told me her laundry secret: for those challenging spots, mix hydrogen peroxide with Dawn, and scrub it in with an old toothbrush. Magic. It may take more than one time, but it visibly lessens with each wash, and many times, it disappears the first time.

I am a master at dropping food down my front, leaving oil spots in the laundered shirts. This mixture removes the spots and lets me avoid throwing away otherwise perfectly good clothing.

Smells
I play ice hockey, and sometimes the stink just doesn't leave my stuff afterward. I had one red shirt that I wore under my jersey and really liked--and it came out of the dryer stinking like B.O. I rewashed it with no improvement. I soaked it in a baking soda-water mixture. That helped a bit.

Then I started washing my stinky stuff with either a cup of vinegar or a cup of washing soda. If I'm not mistaken, this makes the laundry a little more acidic or a little more basic. Either way, it really helps destinkify my hockey stuff. And I get to keep my favorite red shirt!

What's your favorite laundry tip?

Tuesday, August 6, 2013

Great options through libraries

In Alameda, we have the Alameda Free Library system. You do have to be a resident of the City of Alameda, and show one utility bill when you apply for a card. They have regular books, magazines, newspapers, manga and graphic novels (child, youth, and adult), VHS and DVD movies, and audio books on cassette, CD, MP3, and Playaway. Playaways are awesome because they require no iPod, cassette player, nor CD player: you just plug your headphones (or your FM transceiver, for the car) into the jack, supply a AAA battery, and go. It's solid state, so no moving parts, and remembers where you were in the audio book (but not the volume level, which is a pet peeve of mine). The Alameda Free Library also has multiple eBooks and audio books available online through the Overdrive system. (Note that many of the audio titles are not available to play on iPods, another pet peeve.) Alameda Free also has a tool lending service, but I haven't used it yet and don't know how well it works or what is available.

But we are also in the Alameda County library system. You can get a card online! This card not only allows you to check out books at the Alameda County branches, it also allows you to borrow passes to museums and aquariums in the area. This library system also offers electronic books through the NoveList site, but I'm not familiar with it yet.

Finally, if you can go into San Francisco in person, you can get a San Francisco Public Library card. They have two or three times the number of books available online (Kindle and other ebooks, and audio books). It's highly worthwhile to fill out the form ahead of time, to make the process faster. Since I'm not in San Francisco that regularly, I'll likely never check out an actual book there.

Three options for free library and library-related services. Wonderful!