Idea
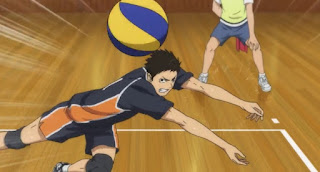
I had the idea to make Haikyuu uniforms for me, my niece, and my son. It didn't seem too hard... but I thought about it for a few years, literally, before finally starting. I just wanted comfy, maybe pajama-like outfits that looked convincingly like Karasuno High's uniforms. I chose Suga's number; my son chose Hinata's; and my niece chose Noya's (and so needed one with orange as the main color instead of black).
Supplies
T-shirts
I started with Hanes Beefy-T t-shirts from the Hanes website. They a nice, heavy quality jersey, are often on sale... and used to come in orange as well as black. They seem not to have orange any more in the regular Beefy-T t-shirts, but they do have the "original Hanes men's t-shirt" or "garment-dyed t-shirt" in orange, it seems.
Anyway, I ordered several 2x and 3x Beefy-T shirts in black and orange, and some cotton jersey shorts as well.
Note: I originally bought the dark shirts in navy, because I thought they were navy and are often portrayed that way... then confirmed that the uniforms are actually black and orange.
Numbers and Kanji
I bought iron-on white numbers from Michaels. I plan to cut the Kanji and the barefoot/ics images from unused numbers. I printed them out reversed so that cutting them out results in unreversed images.
Trim
For the white trim, I originally thought I'd use regular bias tape, but at the fabric store, I found there is such a thing as jersey bias tape. It's knit instead of woven and so is very stretchy, like jersey fabric. They didn't have enough of white, so I ended up getting "natural," but against the stark colors, I think it looks great!
Tools
I also bought ballpoint sewing-machine needles, as those are best for knit fabrics. In addition, I used a cutting mat and rotary cutter to cut the shirts.
Stitch Used
Because it is a knit fabric, a regular straight stitch is not a good choice, as it will not stretch with the fabric and will likely snap. The fabric store advised using zigzag, but making it narrow and short rather than wide and long.
行きましょう!(Let's go!)
Collars
I did the collars first, cutting each collar by hand out of a t-shirt (one black, one orange) and swapping them. I left about 1/4" to sew together. I used black thread but I think with the heaviness of the fabric, the thread color wouldn't really matter. I went back over some spots where I missed the edge of fabric underneath.
The second option allows you to have the golf-shirt style collars that are on the actual uniforms. I found
ribbon on Etsy that could have let me do this, but I chose the path of simplicity.
Sides
I had originally sketched the sides as curved on the edges, but then realized that the uniform photo I had printed out showed that, but was wrong. The sides are straight lines:
(Image copy right Haruichi Furudate, of course)
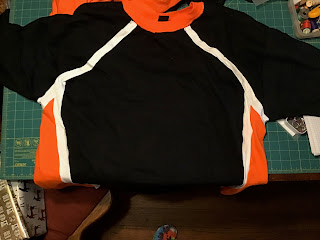
I lay the shirts on my cutting mat and cut 2.5" in from the edge (so 5" wide). I envisioned the diagonal stripe that goes from the collar to the armpit and stopped cutting about where the intersection with the vertical stripe would be, and then cut around the armscye to finish. I repeated this on the other side, and swapped the pairs of fabric strips.
To join them together, I had originally thought to lap the fabrics and zigzag on top, then sew the bias tape over that seam, to cover the zigzag. A gal at the fabric store pointed out that I could use the way the bias tape is prefolded, and sew each edge of colored fabric to the folded-over edge of the bias tape (I'll draw a sketch of this later to be clearer). I think it turned out great. Here is the first finished side seam:
Neck/armscye trim
I finished all of the side seams in the same way, and then began the trim that goes from the collar (where I didn't need to join fabrics) down to the top of the vertical trim, around the armscye below the sleeve, and then back up to the collar on the back.
First bit of trim pinned on, meeting the vertical stripe:
Since this part of the trim starts off as basically appliqué, I tucked the raw end of the trip under a bit and then zigzagged each edge down to the open seam at the armscye. So this is (for the Hinata jersey) black above and orange below. I used the same method as for the sides here, sewing one folded edge to the orange fabric and the opposite edge to the bottom of the armscye. I had to do some trickiness to join the appliquéd trim to this section, so I pinned and stitched just to make the edges meet up and not have open holes. After this part, I continued the trim up to the back of the collar. I repeated this on the other side.
One side modeled by my son:
Sewing: Done!
The Hinata jersey is all sewn and just needs its numbers and kanji:
And here's the libero jersey (#4, Nishinoya):
Numbers and Kanji/decorations
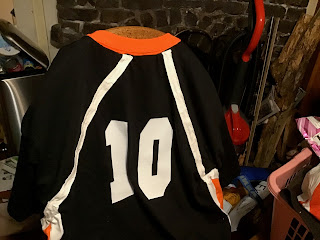
I ironed on the numbers, front and back, according to the directions on the Michael's package. Then I took a number I knew I wouldn't need (the 8) and cut the kanji and footprint/"ics" out of it. But first, I flipped the design horizontally. I watched a YouTube about using stencils with iron-ons and was so glad she pointed out that you need to flip your image, so that the ironed-on image is facing the right way.
I grabbed screenshots of the kanji and the footprint, pulled them into Preview on my mac, and flipped them horizontally.
After printing them out at the size I wanted, I taped them to the unused '8' and cut the designs out with a sharp Xacto knife on my small cutting pad from Daiso.
The little bits below "Karasuno" and the dot for the "i" wouldn't stay on the iron-on plastic, so I ended up bonding the numbers and the main decorations first, and then carefully placed the bits and the "i" dot and re-ironed them on (front and back). I'm really pleased!
Done!
Hinata jersey, front:
Back:
Nishinoya jersey, front only:
Final Notes
I wish I'd had time (and enough of the trim! I used well over 4 yards per jersey) to do the third jersey, #2 Sugawara, for me, as well as the matching shorts for each of us. Maybe sometime soon!


